
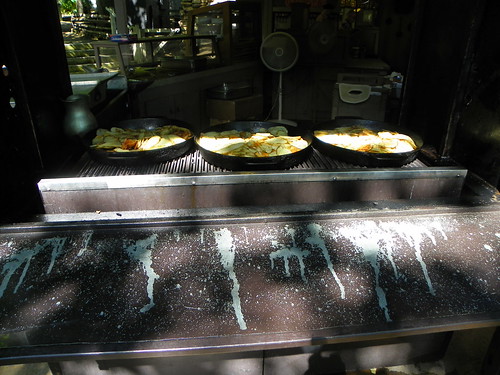
Three Steps to Cooking Perfect Steak on Your Outdoor BBQ Grill

If you're like me, When you crank up that BBQ grill for the season it's all about cooking perfect steak. I love all kinds of foods cooked on an outside bbq grill, but none says summer quite like that sweet smell of steak on the grill. For me, the results are always predictable and always pretty close to perfect. This is because I use the same process every time and I start with the end result in mind. So that's my first tip: cooking perfect steak starts with identifying what that means to you and then learning about the basic cooking method so that you can navigate to that desired point. You'll have to decide on the definition of perfection for yourself - that's the fun part. But the next few paragraphs should help with the second part - learning the process and the basic cooking method that helps get you to your perfection.
Three Steps to Cooking Perfect Steak on Your Outdoor BBQ Grill
20 Lido Road, Winter Spgs, FL 32708


Video Clips. Duration : 4.20 Mins.
20 Lido Road, Winter Spgs, FL 32708
www.tourfactory.com/986729/r_www.youtube.com 20 Lido Road Winter Spgs, FL 32708 Contact Diane Sterling P.A. for more information. Keller Williams 407-761-051...
20 Lido Road, Winter Spgs, FL 32708
20 Lido Road, Winter Spgs, FL 32708
20 Lido Road, Winter Spgs, FL 32708
20 Lido Road, Winter Spgs, FL 32708
No URL 20 Lido Road, Winter Spgs, FL 32708
Sunbeam Grills Are No Longer Being Made - Find Out How to Keep Your Favorite GrillMaster Running Hot
GrillMaster Grills were a series of excellent outdoor gas grills that were made by the Sunbeam company and sold throughout the United States.
Sunbeam Grills Are No Longer Being Made - Find Out How to Keep Your Favorite GrillMaster Running Hot
9,000 4BR/5BA - Tucson, AZ - 5141 E Oakmont Drive
Tube. Duration : 0.53 Mins.
9,000 4BR/5BA - Tucson, AZ - 5141 E Oakmont Drive
Tucson Homes for Sale and Real Estate Open House 04-28-2013 from: 1PM to: 4PM 9000 4 bedrooms, 5 baths 5141 E Oakmont Drive Tucson, AZ 85718 MLS #: 21230...
9,000 4BR/5BA - Tucson, AZ - 5141 E Oakmont Drive
9,000 4BR/5BA - Tucson, AZ - 5141 E Oakmont Drive
9,000 4BR/5BA - Tucson, AZ - 5141 E Oakmont Drive
9,000 4BR/5BA - Tucson, AZ - 5141 E Oakmont Drive
No URL 9,000 4BR/5BA - Tucson, AZ - 5141 E Oakmont Drive
Barbecue Cooking Tips - Indirect Heat Grilling For Perfectly Done Outdoor Roasts
The spring and summer months are a great time to pull the old grill out of the garage, dust it off and start planning some delicious barbecue dishes.
Barbecue Cooking Tips - Indirect Heat Grilling For Perfectly Done Outdoor Roasts
Beacon Star 30 inch Outdoor Coffee Table with Integral Fire Pit and Chromed BBQ Grill - UK
Tube. Duration : 1.00 Mins.
Beacon Star 30 inch Outdoor Coffee Table with Integral Fire Pit and Chromed BBQ Grill - UK
http://www.amazon.co.uk/gp/product/B00193GGLY/ref=as_li_ss_tl?ie=UTF8&tag=barbecuesathomechannel-21&linkCode=as2&camp=1634&creative=19450&creativeASIN=B00193...
Beacon Star 30 inch Outdoor Coffee Table with Integral Fire Pit and Chromed BBQ Grill - UK
Beacon Star 30 inch Outdoor Coffee Table with Integral Fire Pit and Chromed BBQ Grill - UK
Beacon Star 30 inch Outdoor Coffee Table with Integral Fire Pit and Chromed BBQ Grill - UK
Beacon Star 30 inch Outdoor Coffee Table with Integral Fire Pit and Chromed BBQ Grill - UK
No URL Beacon Star 30 inch Outdoor Coffee Table with Integral Fire Pit and Chromed BBQ Grill - UK
http://www.amazon.co.uk/gp/product/B00193GGLY/ref=as_li_ss_tl?ie=UTF8&tag=barbecuesathomechannel-21&linkCode=as2&camp=1634&creative=19450&creativeASIN=B00193...
Tags:
Most of us know how to make basic grilled foods like burgers, hot dogs, steaks and sausages. These are generally cooked by the most basic form of grill cooking, direct heat cooking. Direct heat grilling means that the food is directly over your heat source (hot coals or gas burners) and cooks from this direct heat. Direct heat is perfect for smaller food items that you want to quickly sear the outside, producing that beautiful browned caramelization on the surface, while sealing in the juicy freshness of the inside. It is the ideal cooking style for steak which is nice and browned on the outside yet pink and juicy on the inside.
Outdoor Grill
Barbecue Cooking Tips - Indirect Heat Grilling For Perfectly Done Outdoor Roasts
However, what many grilling neophytes don't know is that direct heat is not the only way to cook on a barbecue! Another important style of cooking is indirect heat grilling. Indirect heat relies on a heat source which is not directly next to or beneath the grilling food, but is rather separated by some distance. With the lid closed on your barbecue, this gentler form of heat cooks the food by convection of ambient heat in the hot air and smoke within your grill, rather than by direct radiant heat from the coals. This is similar to the way food cooks in your oven when roasting, except without the wood smoke!
Barbecue Cooking Tips - Indirect Heat Grilling For Perfectly Done Outdoor Roasts
So why should you learn how to cook with indirect heat? What is it good for? Well, if you tried to grill a whole chicken with direct heat over very hot coals, the surface skin and fat would be burnt to a crispy, black char long before the interior was fully cooked. Also, by the time the middle was cooked, the flesh would be dried out. You would loose the surface flavors and juicy interior of a well roasted chicken. So the solution? You guessed it, indirect heat. Indirect heat allows your larger cuts of meat to cook slowly, developing the outer brown color more slowly while allowing the interior to cook to perfect doneness. A perfect rack of ribs requires the meat to cook slowly until the meat is tender and almost falling off the bone. A chicken should cook completely while the exterior does not char. All this and more can be accomplished with indirect heat.
So how do you do it? Lets find out!
For starters, you will need a couple of things to help make your indirect grilling perfect (you can do without them, but they are helpful:
A shallow metal pan or dish half-filled with tap water
A meat thermometer
A grill thermometer (if your grill doesn't have one built-in)Start your charcoal or gas burners as you normally would.
If you are using charcoal, when your charcoal is all hot and ready (when the briquets have a layer of grey ash over them), separate the coals onto the two sides of your grill. You will have two piles of coals on either side of your grill with a large empty space in the middle. Weber and other companies make indirect grilling coal holders just for this purpose which are basically metal baskets that hold charcoal on either side of your grill. However, you can do without any special equipment.
If you are using a gas grill, you can use indirect heat by turning off one of your burners to have a less hot spot on your grill. Ideally, if you have three burners, you would turn off the middle one, leaving the two side ones on. If you only have two burners, turn on on and leave the other off.
Place the metal pan with water in it in the middle of your charcoal grate, between the two piles of charcoal (on on the turned off burner if you have a gas grill). This will catch drippings from your roasting meat and will also help keep the interior of your grill humidified so that your meat doesn't dry out.
Put your grill grate on.
Close the lid of your grill and let the heat accumulate. Use your grill thermometer to check the temperature inside your close grill to make sure there is adequate heat. If it is not warming up, either add more coals and wait for them to start burning or turn up your burners if you have a gas grill
Open your grill and place your prepared food (whole chicken, ribs, roast, etc.) in the "indirect heat zone" of your grill. This is the open area, under which there are no coals or gas burners burning.
Close the lid and let your food roast.
Check back periodically and flip your meat over or rotate it occasionally. Also check that there is still adequate heat in your barbecue. Baste your meat regularly when the surface dries out to keep it moist, about every 15 minutes.
If the surface of your meat looks like it is browning too fast in any one area, be sure to turn or flip it so that all sides get equal heat and exposure. If it still seems like the surface is cooking too fast, your heat may be too high or the roast is getting too much direct heat from one of the heat sources. Attempt to move the charcoal away further or move the roast to a more isolated spot on the grill.
Always remember to keep the cover of your grill closed between checking on your food. You want to keep all that good heat inside to help roast your meat!
When your roast is looking like it may be done, begin testing for doneness. The most accurate way to do this is with a meat thermometer inserted into the thickest part of the meat (on a chicken this is the deepest part of the inner thigh meat or deep in the breast). Do not put your thermometer up against bone as this can artificially increase the temperature reading. Most thermometers have readings for doneness for beef, pork, and chicken. If yours does not, general rules to go by for chicken is 165 degrees, pork 160 - 170 degrees, beef/lamb/veal 145 for medium rare, 160 for medium and 170 for well done. If you do not have a meat thermometer, you can prick the meat deeply with a skewer or fork. If pork and chicken are done adequately, the fluid that runs out should be clear, not red or pink. If all else fails, cut a small slice into a deep part of meat to check the color.
When your food has reached its ideal level of interior doneness, remove from the grill and place on a large platter or plate.
Cover with tin foil and let your roast sit for 5 to 10 minutes at least so that the interior juices and heat redistributes.
Carve and serve!
A few other tips to make your indirect heat grilled foods shine!
Marinating - Because grilling is a dry heat that can have the tendency to dry out meats that are cooked for a long time, marinating your food before cooking is a great way to both add savory flavors as well as increase the juiciness. There are many recipes for delicious marinades for poultry, pork and beef and even many bottled marinades available in supermarkets. Another option similar to marinating is brining which really seals in and concentrates flavors.
Basting - I strongly recommend basting your meat as it cooks over indirect heat. When the surface dries out, every 15 minutes or so during the cooking time, baste it generously with a basting brush. The basting mixture can be similar to the marinating mixture or alternatively it can introduce new flavors. For example, barbecue sauce is not good to marinate with, it will just burn on the meat if it cooks too long. However, introduced later in the cooking process to baste the meat a few times before it is done creates a great, savory coating of flavor. Other great options for marinating include lemon juice, olive oil, and red wine vinegar, either together or alone. Again, there are many recipes with recommendations for basting mixtures for your slow roasted grilled foods. For safety, if you baste with your marinade, remember that your marinade came in contact with your raw meat. Therefore, avoid adding this mixture in the last 15 to 20 minutes of cooking so you don't introduce any uncooked meat to the surface of your roast! Its best to use a fresh basting mixture if possible.
Well that's it! A quick and complete primer to indirect grilling. I think you will find that it brings your barbecue cooking to a whole new level, making your roasts more tender and juicier.
Barbecue Cooking Tips - Indirect Heat Grilling For Perfectly Done Outdoor Roasts

Tucson Homes for Sale and Real Estate Open House 04-28-2013 from: 1PM to: 4PM 9000 4 bedrooms, 5 baths 5141 E Oakmont Drive Tucson, AZ 85718 MLS #: 21230...
Keywords:
They are a beloved patio accessory for many families and have ably handled the outdoor cooking and grilling for many years.
Outdoor Grill
Sunbeam Grills Are No Longer Being Made - Find Out How to Keep Your Favorite GrillMaster Running Hot
But lately you may have noticed that they are becoming rarer and rarer.
Sunbeam Grills Are No Longer Being Made - Find Out How to Keep Your Favorite GrillMaster Running Hot
You are not imagining things.
Sunbeam stopped producing Grillmaster Grills in March of 2003.
But if you have a GrillMaster that you still use and want to keep on using - you are in luck. There are replacement parts for Sunbeam grills available through many online retailers. Thousands of parts are available for almost every models, so chances are good that you can find the one you need.
Gas Grill Wear Out
Even if you take excellent care of your gas barbecue grill, clean it every time and store it indoors, parts are still going to wear out from use and require replacement parts. And unlike a cheap charcoal grill, it is frequently far less expensive to repair or replace a part in a gas grill than it is to buy a whole new grill.
Gas grill burners will always rust with age due to there design and materials. Even stainless steel gas grill burners will wear out and even rust in time.
Your Sunbeam grilling accessories can also wear out and need replacing. These include the grates, heat shield, heat tent, flame tamer, and I-tent.
Rust, grease and drippings can also stick to the surfaces and cause flare-ups.
Sunbeam Grills Are No Longer Being Made - Find Out How to Keep Your Favorite GrillMaster Running Hot
www.tourfactory.com/986729/r_www.youtube.com 20 Lido Road Winter Spgs, FL 32708 Contact Diane Sterling P.A. for more information. Keller Williams 407-761-051...
Keywords:
It All Starts BEFORE Cooking Tenderloin!
Outdoor Grill
Three Steps to Cooking Perfect Steak on Your Outdoor BBQ Grill
For most carnivores, the beginning of the process towards steak nirvana is when you actually start cooking tenderloin. Unfortunately, this approach leaves out one of my best secrets for cooking perfect steak: start with the whole tenderloin. There are so many advantages to buying a whole tenderloin and breaking it down yourself. You can definitely save some money learning how to do this, and it is a lot easier than you think. When you buy the whole tenderloin, the first thing you have to do before cooking tenderloin is to remove the "chain". The chain is the side muscle; it contains a lot of the fat and is great for use later in stews, chilis or even my favorite treat: Tenderloin Philly cheese steak. But that's a whole other way for cooking tenderloin and beyond the scope of this article! Once you've removed the chain, you must remove the thick top end of the tenderloin - "the head". This, too can be set aside and used later. What you are left with is a long tenderloin from which to cut your steaks. The most important thing to remember is to try to cut the steaks of consistent size by weight. Consistent size equals consistent cooking, which equals reliable cooking! Use a scale and aim for a consistent size somewhere between 3 and 5 oz per steak, depending on who you're cooking for.
Three Steps to Cooking Perfect Steak on Your Outdoor BBQ Grill
Do you Really Know How to Grill Beef?
If you believe most people, grilling takes no skill at all. It's so much easier than cooking and anyone can do this with little advance planning or common knowledge. Right? This is actually one of my favorite cooking myths! Knowing correctly how to grill beef (or anything else) is essential to outdoor cooking success. Grilling is direct source conductive heat. Cooking is to grilling as driving is to flying a rocket ship. Everything happens quickly and intensely with grilling and that includes mistakes. So, let's begin with the simple process:
First, get the grill as hot as possible. Keep the lid down while heating the grill, but open when cooking. This is another common grilling mistake. If you close the lid while cooking, the method you are applying is similar to that of oven cooking. Why bother doing it outside on the grill? Brush the steak with olive oil and season with salt and pepper. You can use any other kind of seasoning or rub here, but I find that the true steak flavor comes from a good cut of meat and you don't need anything else. You might have a different opinion so season as you see fit. Place the steak on the hot grill "show side" down - meaning the side you'd want to display on the plate goes down on the grill first. Now observe for signs of done-ness. When the steak is 75% done on one side, flip it over and cook the rest of the way.
Knowing how to grill beef is a simple process, but most people still go into it blindly. By following the steps, you will always be working towards cooking the perfect steak, rather than just cooking a steak until it has reached a safe to eat temperature and texture. The fine line of difference between acceptable and perfection make all of the difference, and with perfection so reliably reachable, why not aim high?
How Long Should the Meat Cook? Until It's Done!
So, here we are. We always arrive at the same question. In travel, it's: are we there yet?; and in cooking, it's: how long should the meat cook?. Well, I have one answer to all of the how long questions: until it's done. Yes, it really is that simple. Let the meat cook until it's done. And now we get into the more interesting question: how do I know when it's done? I often say that cooking is a journey - so you are a tourist, an observer on that journey. As you observe what happens to the steak during the cooking process, you will notice some predictable things happen. First, at 165 degrees, proteins coagulate. What you will see when this happens is that the steak will stiffen and shrink. You will see the sides of the tenderloin start to get brownish gray. At 320 degrees, the sugars caramelize. If you lift a side of the steak up slightly and look underneath, you will see the formation of grill marks to indicate this is happening. You will also begin to smell that nice, sweet, smell - telling you that you are cooking perfect steak and all is happening as it should. When the steak is 50-75% cooked on one side, it reaches what is termed in French culinary as "a point". You will observe the juices start to bubble up to the red top. This indicates it is time to flip the steak, allowing it to finish its cooking on the other side. The last observation you will make to determine done-ness is the most quantitative because you will use a thermometer. Don't cut open your steak to peer into the middle! Don't stab at it with a fork! Both of these activities will release all of the juiciness you just worked so hard to achieve! 125-135 degrees is rare; 145-150 is medium and 160-165 is well done. So pick your temperature and remove the steak from the grill. But before serving it, let it rest for 5-10 minutes so that the juices can redistribute and run off onto the non-serving plate.
Just by understanding these simple facts about grilling, cooking perfect steak is almost a guaranteed result. Go ahead and get your own whole tenderloin today and get ready for some great outdoor eating!
Three Steps to Cooking Perfect Steak on Your Outdoor BBQ Grill
No comments:
Post a Comment